This tab enables the configuration of the Customer Display Screen as well as Kiosk-related settings.
To skip to a particular section, click on one of the following links:
Customer displays are used to give the customer a view of the items entered into the sale.
It helps to keep them informed of the running total and some can display advertisements to promote products.
Idealpos supports two different types of Customer Displays:
Click here to skip to the Customer Display section.
Idealpos also supports basic Kiosk functionality whereby Idealpos can be configured in a way that allows the customer to order their own items from a POS terminal screen, similar to the way customers can order their own food from a Kiosk terminal at major fast-food chains.
When a POS terminal is configured as a Kiosk, it will automatically login as a specific Clerk as well as having the ability to create a customised button layout which will prevent the customer from accessing functions of the POS which are reserved for standard POS terminals that have a dedicated Clerk serving customers.
To use the Kiosk function, Idealpos requires a 1920x1080 resolution screen configured in a portrait orientation.
Click here to skip to the Kiosk section.
There are four resolutions which can be selected, and there are a number of different configurations which have been added as well as a preview example.
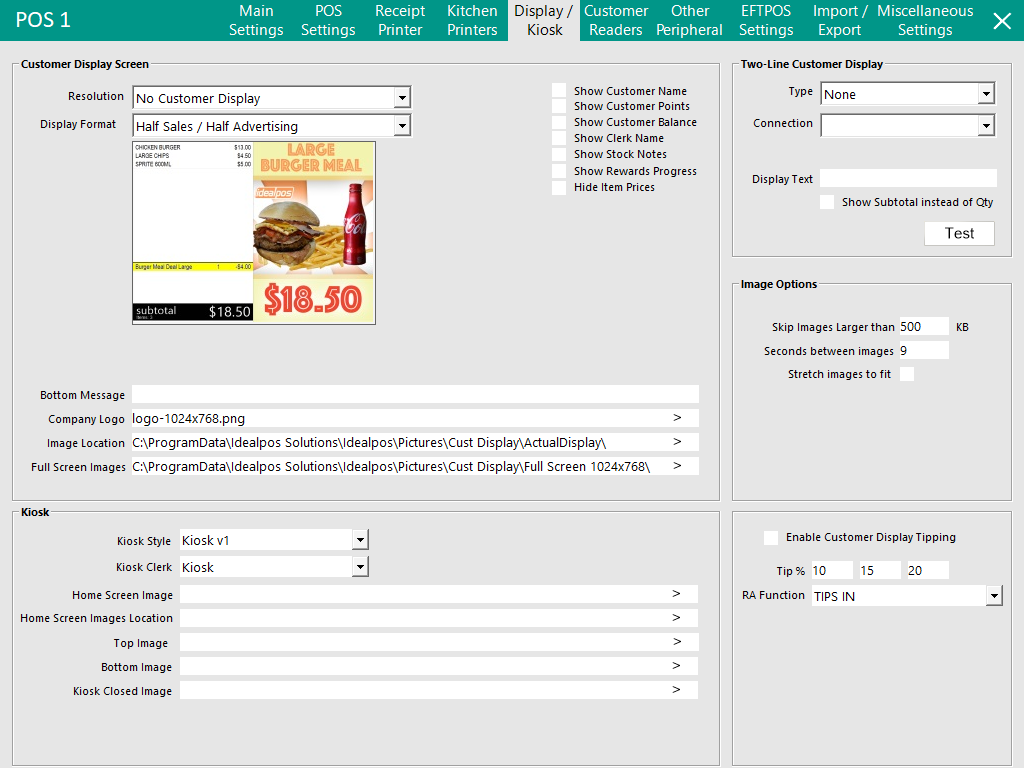
Go to Setup > POS Terminals > Modify > Display/Kiosk > Customer Display Screen.
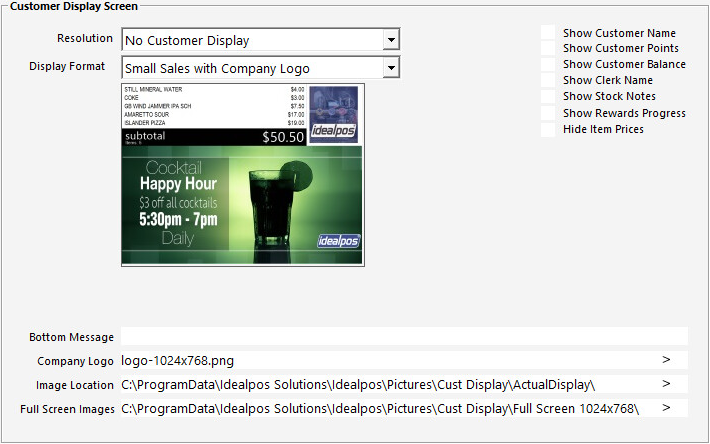
Resolution: Select which resolution you want to use from the drop-down menu. If you select a resolution, the Customer Display screen will be enabled. Choose from 800 x 600, 1024 x 768, 1280 x 768, 1024 x 600, 1280 x 800 or 1366 x 768.
Display Format: Select which display type you want to use. A display example will be shown beneath the drop-down.
Show Customer Name: Will display the Customer's name on layouts with Company Logo.
Show Customer Points: Will display the Customer's points on layouts with Company Logo.
Show Customer Balance: Will display the Customer's balance on layouts with Company Logo.
Show Clerk Name: Will display the clerk name on layouts with Company Logo.
Show Stock Notes: Will display the stock notes underneath the stock item.
Show Rewards Progress: Will display the current rewards progress of customers added to the sale.
Hide Item Prices: Will hide the prices of stock items on the display.
Bottom Message: Displays a message at the bottom of the screen, up to 100 characters.
Company Logo: Link the company logo you want to display. This must be kept in the Pictures folder within the Idealpos folder.
Supported Video and Image file formats
Video files - Supported video file formats include .avi and .wmv files, which will typically play without issues. It is possible to save video files in the Display folder. The component used to display images is Windows Media Player, but you will need to check your videos before use, as not all formats will display. There is no limit on the length of the video that can be played, as the ‘# seconds between graphics’ setting will be overridden by the video. Unlike images, the videos will retain their ratio when resized and will display smaller or larger in the space provided.
Image files - Supported image file formats include JPG, GIF, PNG (8BIT or lower), BMP (8BIT or lower).
There are four folders that can be created to further enhance the use of Customer Display.
If the fields "Image Location" and "Full Screen Images" have not been configured and left as blank, Idealpos will use the Folder Path Locations shown below.
Note that some of these folders will need be manually created in the folder paths shown below.
Custom locations could include the use of Dropbox or other online file storage facilities for large terminal image management.
|
Folder Location |
Folder Exists by Default? | Folder Details | Screenshot Examples of POS Screen/Customer Display utilising images from Folder | ||||||||
|
C:\ProgramData\Idealpos Solutions\Idealpos\Pictures\ |
Yes |
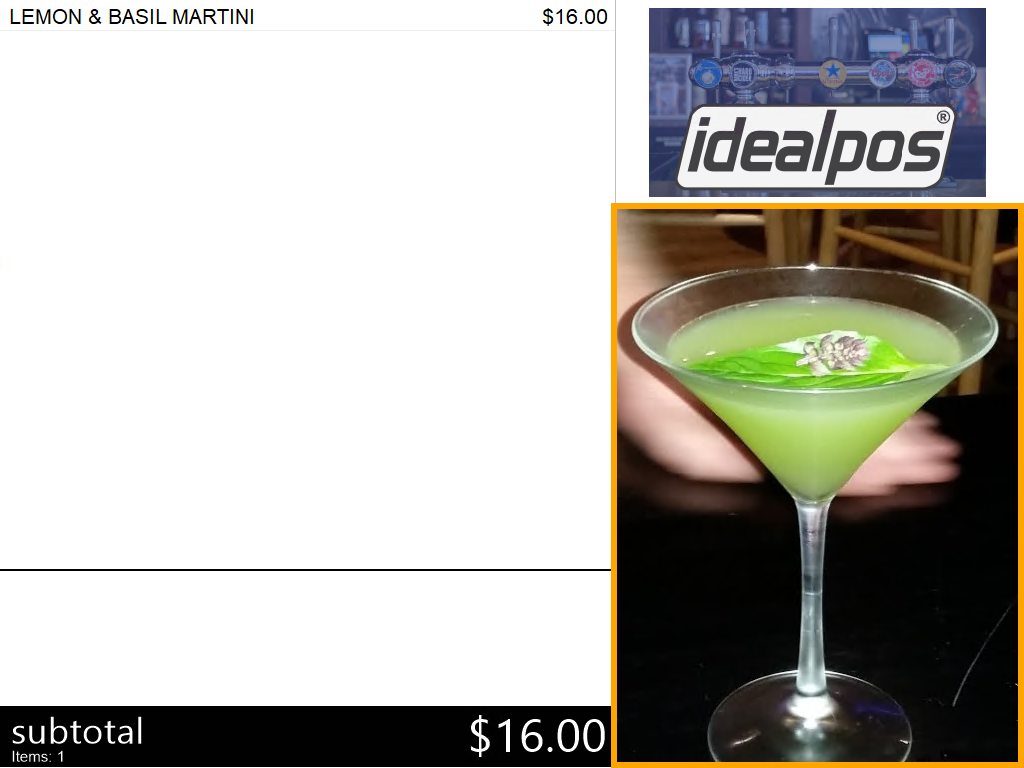
The company logo should be saved to this folder and should be in the resolution that matches the Customer Display Resolution/Format - refer to the Image Sizes section below for more info. The company logo is displayed when using any of the following Customer Display Formats:
Unrelated to Customer Display - Images for POS Screen buttons should also be saved to this folder and when customising the button image, browse to the image stored in this folder location. |

|
||||||||
|
C:\ProgramData\Idealpos Solutions\Idealpos\Display\ |
Yes | All Customer Display advertising imagery can be saved in this location. Any advertising in this folder will also be used for the Full Screen ads on the Customer Display, unless you create the Full Screen folder and save full screen ads within. | 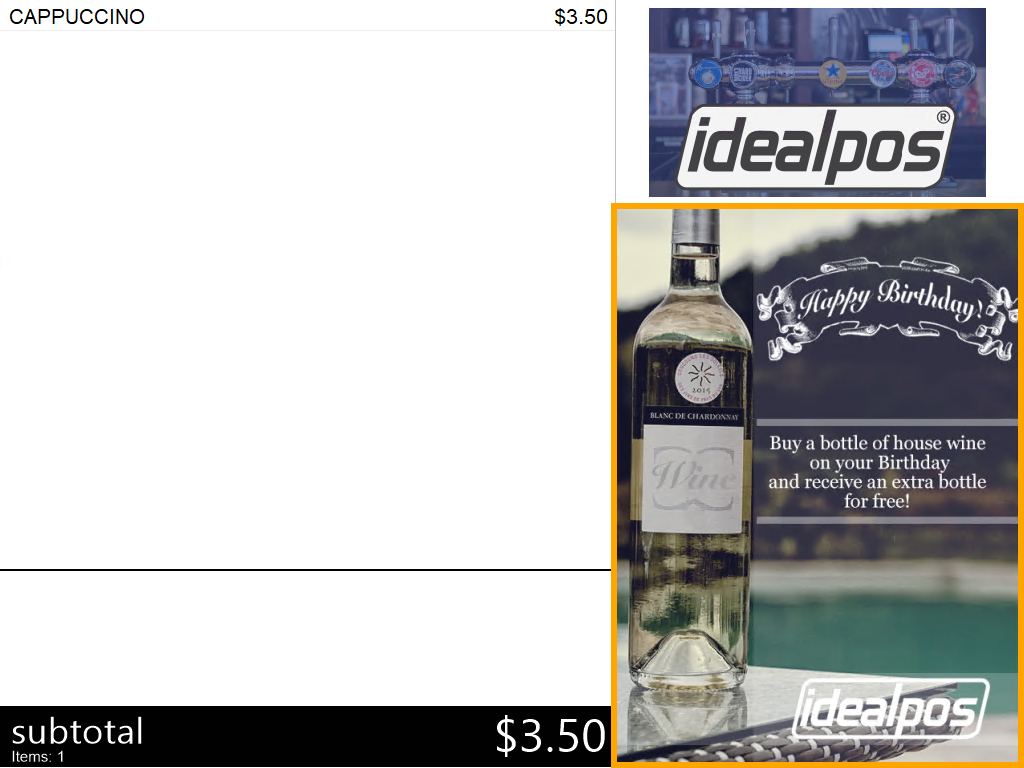
|
||||||||
|
C:\ProgramData\Idealpos Solutions\Idealpos\Display\Full Screen |
No - Folder needs to be created manually |
If you want to take full advantage of the full screen ads, create this folder. If required, custom folder locations can be specified using the fields "Image Location" and "Full Screen Images". |

|
||||||||
|
C:\ProgramData\Idealpos Solutions\Idealpos\Display\Stock Items |
No - Folder needs to be created manually. |
Idealpos supports displaying a Stock Item on the Customer on the Customer Display at the same time that the Stock Item is added to the sale. If a Stock Item doesn't have an image, then the previously displayed image will continue to appear on the Customer Display, and will eventually time out and cycle to the next advertising image (if another item with an image isn't scanned). The Customer Display Formats that support this function are listed as follows:
If you want to use this functionality, create this folder. The Stock Items that are required to appear on the Customer Display must have a filename matching the Stock Code that you want to display. The resolution of the images should be the same as the resolution listed in the Adverts column for the Customer Display Resolution that's being used (refer to the Image Sizes table shown further below). |
|
||||||||
There are multiple image sizes required for your images and logos to display perfectly on the display.
|
|
800x600 |
1024x768 |
1280x768 |
1024x600 |
1280x800 |
1366x768 |
||||||
|
Logo |
Adverts |
Logo |
Adverts |
Logo |
Adverts |
Logo |
Adverts |
Logo |
Adverts |
Logo |
Adverts |
|
|
Small Sales with Logo |
179x189 |
800x393 |
403x189 |
1024x561 |
659x189 |
1280x561 |
403x189 |
1024x393 |
659x189 |
1280x593 |
745x189 |
1366x561 |
|
Small Sales No Logo |
|
800x393 |
|
1024x561 |
|
1280x561 |
|
1024x393 |
|
1280x593 |
|
1366x561 |
|
Full Height Sales |
179x189 |
179x393 |
403x189 |
403x561 |
659x189 |
659x561 |
403x189 |
403x393 |
659x189 |
659x593 |
745x189 |
745x561 |
|
Half Sales/Half Ad |
|
399x599 |
|
511x767 |
|
639x767 |
|
511x599 |
|
639x799 |
|
682x767 |
|
Full Screen Ad |
|
800x599 |
|
1024x767 |
|
1280x767 |
|
1024x599 |
|
1280x799 |
|
1366x767 |
Stock Item images should be the same size as the ad sizes you are using for the screen if you want them to fit perfectly on the display.
The advert for the stock item will display for a total of 5 seconds, or until the next items is added.
Each Display Format will allow specific options to be used.
These options are outlined as follows:
This format can use the following options:
This format can use the following options:
This format can use the following options:
This format can use the following options:
This format can use the following options:
This format will display all the time showing only the advertisements you want.
No stock items or other information will display.
This display will also be used automatically when no sales are being performed.
This format is supported on all resolutions except for 1280x768.
If the Display Format is set to Scale Compliance Format and you try to select the resolution 1280x768, the resolution will automatically be changed to 1024x768.
Also, if the resolution is already set to 1280x768 (with a format other than the Scale Compliance Format currently selected), changing to the Scale Compliance Format will result in the Resolution automatically changing to 1024x768.
This format can use the following options:
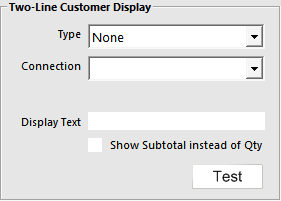
Two-Line Customer Displays are generally green LED displays that show text only.
They scroll messages across the screen from right to left.
These display screens are limited in the amount of information that can be displayed at any one time.
The Two-Line display is an old model that will connect to various devices for display.
You will need to know which model you have, or which emulation to use when setting up this display.
Select Type > Connection > Settings (Usually 9600,n,8,1) > Display text to test.
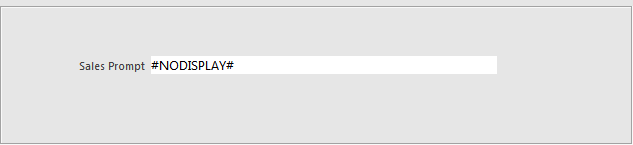
You are able to sell a Stock Item without it displaying on the Customer Display.
Go to File > Stock Control > Stock Items > Modify > Advanced Tab > Sales Prompt > enter the text ‘#NODISPLAY#’.
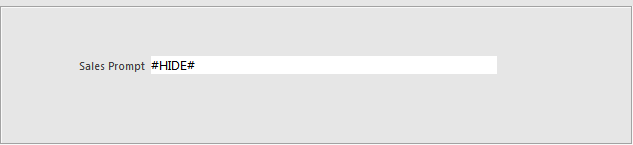
If you want to count how many items have been sold but not display them on either the Customer Display or the POS Screen.
Link a hidden stock item to a number of ticket buttons, and the item will count a total, but not display on any screen.
Go to File > Stock Control > Stock Items > Modify > Advanced Tab > Sales Prompt > enter the text ‘#HIDE#’.
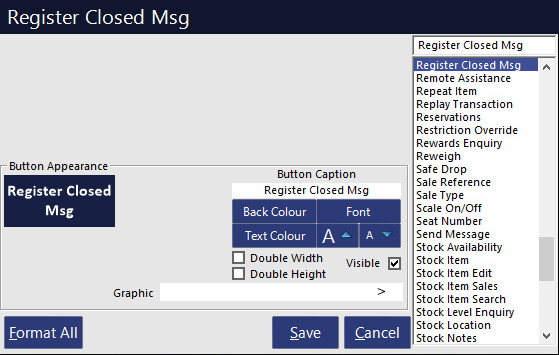
To manually display a message on the customer display that the register is closed.
Once a sale is started it will be removed automatically.
It will also appear automatically after an End of Shift is performed.
This section allows the configuration of the following image options:
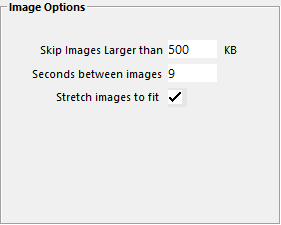
Skip Images Larger than/KB: Select the maximum file size of the image that can be displayed on the Customer Display in KB. Any image larger than the entered value will be skipped from displaying.
Seconds between images: Select how many seconds an image will display on screen. Default is 9.
Stretch images to fit: This checkbox will expand the graphics to fit in the available display area.
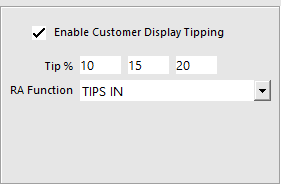
This section allows Customer Display Tipping to be enabled.
In order to use this function, the Customer Display must be enabled (from the Customer Display Screen section, the Resolution dropdown option must be configured to reflect the resolution of the Customer Display) and you will require a Customer Display which is touch enabled (to enable the customer to press the screen and choose their own tip amount).
The following settings are available when configuring Customer Display Tipping:
Enable Customer Display Tipping - When ticked, both the POS screen and the Customer Display will show the "Select a Tip" prompt before finalising the sale. When unticked, the tip prompt will not appear.
Tip % 1 - The Tip percentage to be displayed on the first tip button. The default value is 10%
Tip % 2 - The Tip percentage to be displayed on the second tip button. The default value is 15%
Tip % 3 - The Tip percentage to be displayed on the third tip button. The default value is 20%
RA Function - Select from one of the four available Return Account functions to use when receiving tips via the Customer Display Tipping function.
To configure a Return Account Function, go to: Setup > Function Descriptors, then select Received Account 1 up to Received Account 4.
Press the Modify button and configure the Received Account function as required, including setting the Description to TIPS IN (or whichever description is desired for Tips).
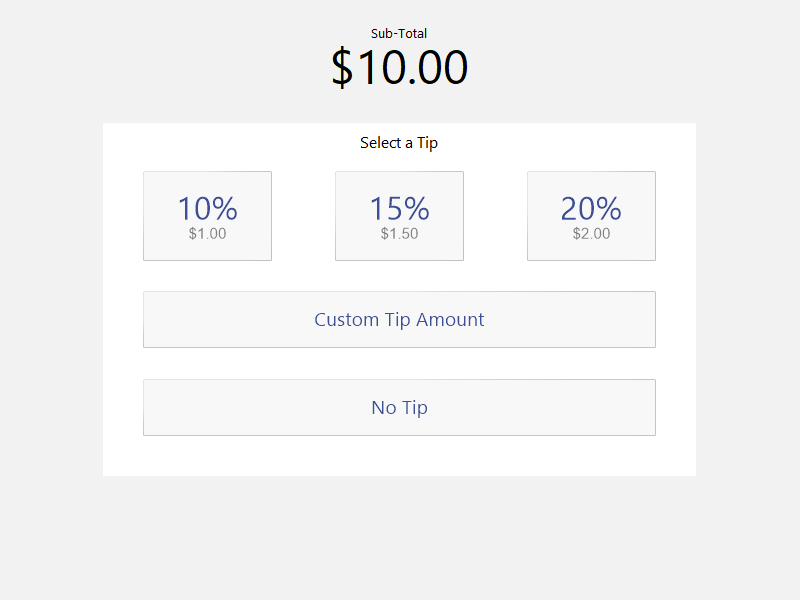
When this option is enabled and the Clerk proceeds to the Tender screen, the POS terminal and Customer Display will display a "Select a Tip" prompt which will contain the below five buttons (the percentages that have been configured above will be displayed on the prompt along with the tip dollar amount when converting the percentage into a dollar amount).
Using a sale with a total due amount of $10.00 as an example, the buttons will appear as follows:
The customer can either advise the Clerk how much they want to tip, or the customer can select their desired tip amount using the touch-enabled Customer Display.
This section provides options which can be used to configure the POS terminal as a Kiosk.
In order to use the Kiosk function, the Kiosk module must be enabled in the Licence.
More information about Kiosk is available in the Kiosk topic.
Tip!
For more information about enabling the Kiosk v2 Demo layout in the Idealpos Demo Database, click here.
For more information about configuring Kiosk v2, click here.
Click on one of the following links that correspond to the Build or Kiosk version being configured [as noted above, Kiosk v2 is available in Build 13 and newer]:
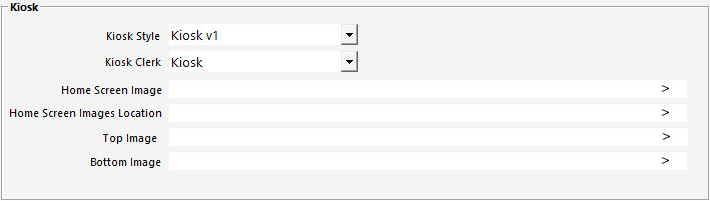
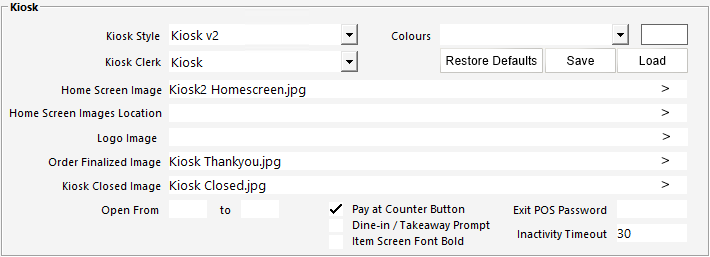
Kiosk Clerk: Specify the Clerk that you want to use for the Kiosk. If desired, you may want to create a new Clerk for the specific purpose of Kiosk use. This may assist when running reports for sales performed at Kiosks.
Home Screen Image: If an image is specified here, it will override any image configured in Global Options > Other Options > Home Screen > Home Screen Graphic.
The Home Screen Image field may be useful for setting a different Home Screen image for your Kiosks compared to your other POS terminals.
Home Screen Images Location: After the Home Screen Image (configured above in the Home Screen Image field) is displayed on the Kiosk Home Screen, Idealpos will then loop through any image and/or video files contained within the folder configured in this Home Screen Images Location field. The folder that contains the Home Screen Images/videos should reside within the Pictures folder located at C:\ProgramData\Idealpos Solutions\Idealpos\Pictures\. Image Formats that are supported include JPG and BMP. Video Formats that are supported include WMV, AVI, MOV and MP4.
The setting that determines the number of seconds between displaying the initial Home Screen Image and the images in the Home Screen Images Location is configured via Back Office > Setup > Global Options > Other Options > Home Screen > Slideshow Start Time.
The number of seconds between images can also be configured in this same area of Global Options within the "Seconds between images" field.
Top Image: Specify the folder location which contains images that will be displayed at the top of the Kiosk screen.
Bottom Image: To display an image at the bottom of the Kiosk screen, browse to the image location here.
Kiosk Closed Image: Specify the filename of the Kiosk Closed Image here.